Have no fear… AutoFlats and Custom Horizons are coming. I just needed a break from them in order to reset my perspective on a few things. In any case, a couple recent threads have me looking at the methodology SGPro uses to find stars and the metrics it provides for them afterward. Obviously HFR is one of them, but I started looking into how we calculate star eccentricity to determine exactly how much its calculation might impact efficiency of the image analysis.
This writeup is a little lengthy because it is also meant to serve as the first draft for formal documentation. If you’re not looking for that kind of commitment in your life, here is the summary:
- SGPro 4.3 will, in addition to HFR, also measure the eccentricity of individual stars, regions and images
- A star’s eccentricity is annotated in the star overlay as
e. Almost all displays of eccentricity are also accompanied byarwhich is the abbreviation for aspect ratio (typically a more human digestible representation of eccentricity) - The image’s mean eccentricity is annotated in the Image Stats module
- A new Regional Overlay exists that will allow you to see eccentricity metrics per-region (9 regions) in order to give you a better understanding of cause and potential corrective actions.
- You can continue to let SGPro choose the precision of the find stars routine, but you’ll also be able to override that and pick the precision that best fits your needs.
- Auto Focus will be able take advantage of the eccentricity metric also… It requires more thought, but accuracy of Auto Focus might see a small improvement if we discard “stars” above a certain eccentricity threshold from the measurement. Stars is in quotes because, for a good AF frame, it is almost a certainty that what you’d actually be removing from the AF data are false positives like nebulosity or very close stars.
- SGPro find stars method now takes distinct advantage of multi-core processors and is able to parallelize this work for speed without loss of accuracy. The 64-bit version of SGPro will be able to handle more simultaneous work than the 32-bit version.
And, now… the details:
First… what is it and do we need a measure of eccentricity?
Eccentricity, in our case, refers to an ellipse’s deviation from a perfect circle. It is a number between 0 and 1 where 0 is representative of a perfect circle and 1.0 is representative of a straight line. In other words, it’s a measure of error for stars that are, in most cases, supposed to be round. Eccentricity can also be expressed as a percentage using its aspect ratio (the long axis to the short axis) where numbers closer to 0% represent a higher quality star / image.
Do you need it?
You’d probably be OK without it, but there are a few direct uses cases where this metric can inform the quality of capture and possibly required corrective actions.. The direct correlation here is that higher mean eccentricities result in a lower quality image (usually). It’s usefulness during capture, really comes down to whether or not you can change it quickly.
That said, the eccentricity metric may be most useful as a means to help cull false positive star identification in Auto Focus. For s star-dense focus field, adding eccentricity as a filter likely won’t make any difference, but when you are focusing on a target in a star poor region, having some misshapen nebulosity or a pair of very close stars interpreted as one star absolutely can influence the quality of focus. Being able to discard these false positives from Auto Focus measurements could make a big difference.
What causes it?
There are cases in which eccentricity is a property of your image train. For instance, you may have a field flattener that is a pretty good, but not perfect match for your scope. In this case, you’d likely see round stars located centrally and as you move toward the outer edges you might notice star elongation in the “out” direction where “out” is a line moving outward from the center of the image through the centroid of each star. You may be able to correct this, but it’s unlikely that it could be corrected as a part of the current imaging session. You may need different spacing between elements or a different flattener all together. In any case, for this scenario, knowledge of the eccentricity of an image is not useless, but neither is it all that useful.
There are cases, where the eccentricity of the image (mean) is high and uniform in nature. This means that there was some environmental factor that has messed your image up and it may need recapturing. An example of this may be an errant breeze or an unfortunate jarring of the scope. In this case, knowledge of eccentricity might be useful, but, for most, I suspect that these types of issues would also negatively impact mean HFR and, as such, would only provide an alternate method of identifying “bad” data. That said, depending on your imaging train, eccentricity might provide a metric for you that has a far greater resolution and may allow you to be more discerning. In other words, a small breeze or guiding issue may have introduce a tiny bit of eccentricity into the sub, but the difference in HFR between “good” and “bad” here may be (for you) a matter of hundredths whereas the difference in aspect ratio, for the same exact error, may be far more prevalent (maybe a difference of ~10% or more). Again, not useless, but not all that useful and depends on your specific needs and gear.
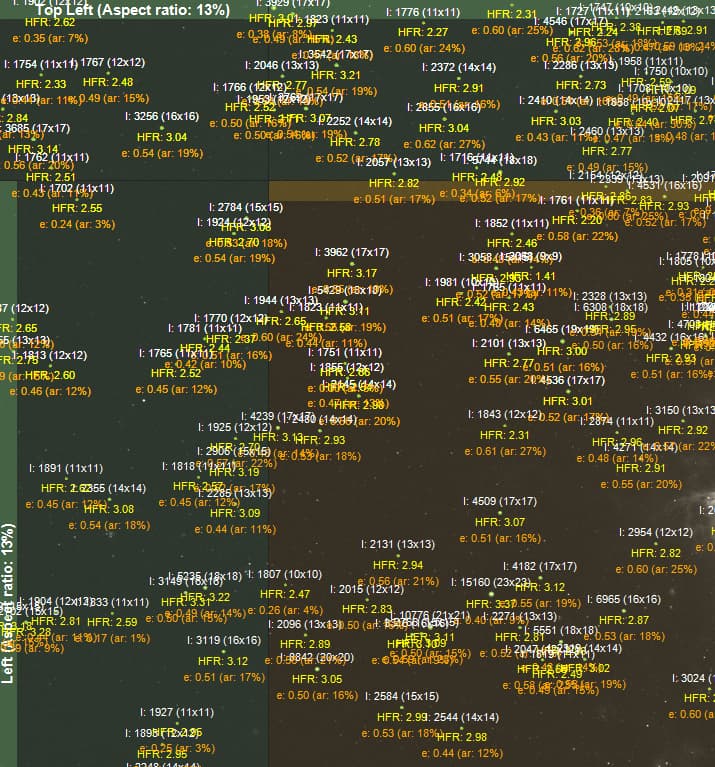
And finally, we come to the issue that I think has the strongest use case (during a capture session). Specifically, alignment issues… especially at longer focal lengths. Nobody wants to take a hex wrench to their mirrors under dark skies, but anyone with a folding light path has probably done so in the past. In other words, this measurement can pretty quickly tell you if you have problematic zones in the image from things like mirror tilt, etc. For instance, if almost all of your image has an acceptable level of eccentricity except for the upper left corner, it is important to understand the direction and magnitude of change required for adjustment. Further, this alignment issue cannot be detected by the HFR measurement alone because the HFR will consistent across all frames. In this case, you’d need an independent metric that can detect differences within a single image and eccentricity fits that bill. Kind of… using the mean eccentricity of an image is not helpful in this case, but SGPro will provide an easy to read, visual representation by zone. Zones that are “good” will have a transparent green overlay and zones not good will be wither yellow or red depending on severity. It looks something like this:

In this case (above), the pattern is odd in that the edges are good, but eccentricity in the center is a bit high. In this sub, the DSO is influencing the value and, in reality, this image has extremely good eccentricity measurements. We will be introducing the notion of custom “zones” per target in the future. These zones will provide direction to SGPro that will allow us to more effectively separate the target from the target’s background and, as such, provide metrics that are less skewed. The mean eccentricity for all regions is displayed in the Image Stats module:

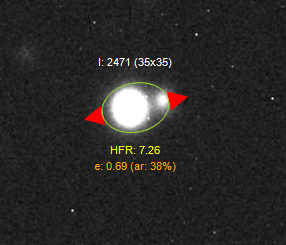
Additionally, you can also see the eccentricity of individual stars. The new labels resemble:
Where e is eccentricity and ar is aspect ratio.
A star with notable eccentricity will also have its direction annotated with colored arrows (green, yellow or red depending on severity; in order from least severe to most severe):

This overlay is called the Regional Overlay and can be found on the image’s toolbar or the image’s context menu:

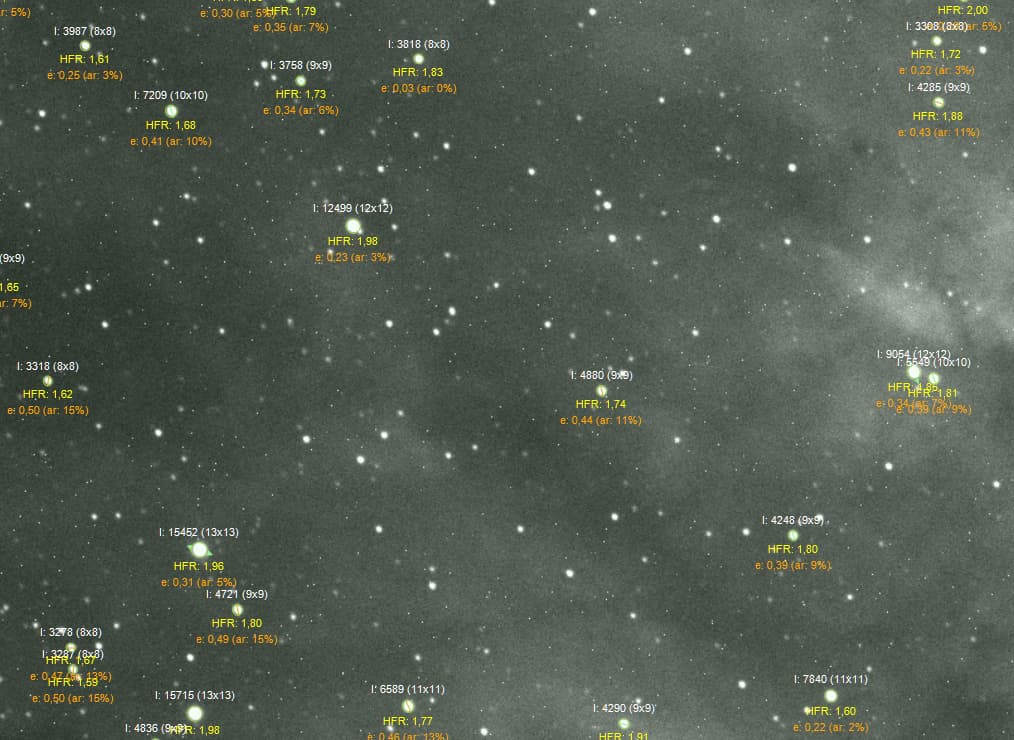
If so desired, you can view the stars and the regional overlay together, but, be warned, it will probably resemble some kind of grotesque number vomit:
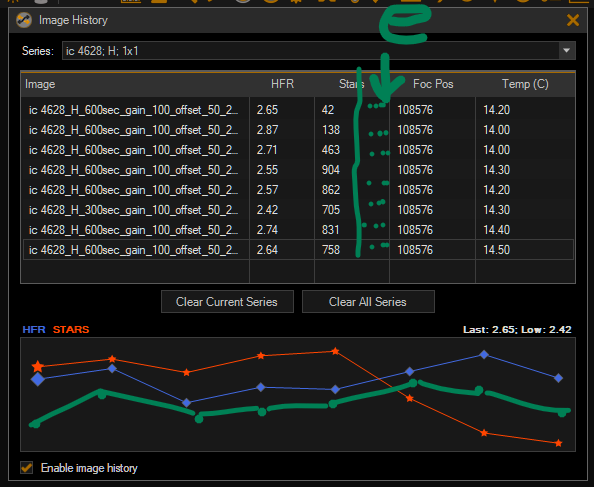
Lastly, the new find stars methods in SGPro give you more control over the quality of the search where methods that are more precise have a higher time cost. The precision levels are, in order of precision, highest to lowest, Ultra Precise, Precise, Normal, Fast, Ultra Fast. These are essentially manual overrides and most people should use the Auto settings (also a choice in that list). This setting will allow SGPro to select the precision of the measurement for you. If you are concerned about this setting, it’s pretty easy to experiment using some of your recently captured subs. When you click the Star or Regional Overlay button on the image’s toolbar, you will be presented with metrics for the image and, also, in the lower left corner an indicator of how long the measurement took. You can use these quality and efficiency metrics to find the balance that is best for you. Here is the new efficiency overlay after measurements are complete:
![]()
Notes on precision
To be more descriptive, let’s briefly cover the impact of using higher speed (less precise) settings. Faster measurements will result in:
- Less accurate centroid. Faster image measurement results in less ellipse boundary markers which produces a less accurate best-fit ellipse for the star. This ultimately results in less precise centroid locations which can cause less accurate HFR measurements.
- Higher likelihood of misidentification of (apparent) double stars. In other words, less precision for stars that are visually close to one another in the image means that the borders between them may end up getting smudged together resulting in a high eccentricity where none exists. Of course, with enough stars in an image, this type of error doesn’t really matter, but for less star dense images, it may matter a great deal.
The point… Should you always use Ultra Precise measurements? A few seconds doesn’t seem like it would matter. Well… maybe. You could be right, but you must consider the impact of this precision over the length of a sequence before you make a decision. Say a session lasts 8 hours and you are focusing once every 45 minutes. That yields 11 focus runs (ymmv). Each focus run uses 9 data points. Let’s say the difference in speed between Auto and Ultra Precise precision settings is 6 seconds. Over the length of this imaginary session, Ultra Precise measurements will cost you just short of 10 minutes. It’s not my place to say if it’s worth it to you and you’ll need to do the math for your typical session. Here, we are just looking at both sides of the story.
All that said, an important note here: If you are using a high focal length scope and your star field is less dense, you will want to override the precision and choose Ultra Precise. The time penalty incurred here for less dense star fields won’t be as severe as if you did the same for shorter FL field with dense star populations.
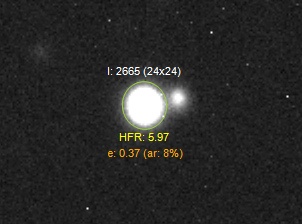
Here is an example showing the same star with different precisions…
More precise:
Less precise:
Faster without Loss of Accuracy
Nothing user-facing here, but just a note that we changed some things in order to make find stars more efficient, In terms of speed, the new find stars method now takes distinct advantage of multi-core processors and is able to parallelize this work for speed without loss of accuracy. Camera sensors seem to be getting bigger and bigger… The 64-bit version of SGPro will be able to handle more simultaneous work than the 32-bit version.
It’s hard to specify exact measurements because they are all dependent on the actual machine you are using, but, in terms of efficiency as a relative measure…
For a wide field star-rich image with dimensions 10,000 x 8,000 pixels:
- With no concurrency, using
Ultra Precise, the image takes ~12 seconds to process. We’ll use this as the baseline. - With 2x concurrency (2 simultaneous “find stars workers”), we see a linear increase in efficiency taking only ~6 sec (2 times faster). Unfortunately the 32-bit version of SGPro taps out here. Attempting to use more concurrency here quickly runs out of resources.
- Using 64-bit SGPro and a machine with 8 core processors, increasing concurrency to 4x (workers) yields results in only ~3s. An increase in speed also at 4x.
- Using 64-bit SGPro and a machine with 8 cores (processors), increasing concurrency to 8x (workers) yields results in only ~1.5s. An increase in speed also at 2x from using four workers.
- Beyond this, we start to see diminishing returns as other things in the process start to present themselves as bottlenecks (like the number of cores on a CPU or other processes used for find stars). For instance, adding a full 16 workers (one for each core and virtual core), we do see a small increase in speed, but not a linear one. This level of concurrency yields results in about 1.3 sec.