SGPro 4.2 currently distributes PlateSolve 2 and 3. There is something to be said for distributing dependencies you are certain work well in your product, but we’ve decided to back off here and let you choose which solvers you want to install. Beyond installing the solvers manually, you’ll only need to tell SGPro where you have installed them. Full details are in the SGPro 4.3 help file.
This change is present in version of SGPro 4.3 AFTER 4.3.0.1223
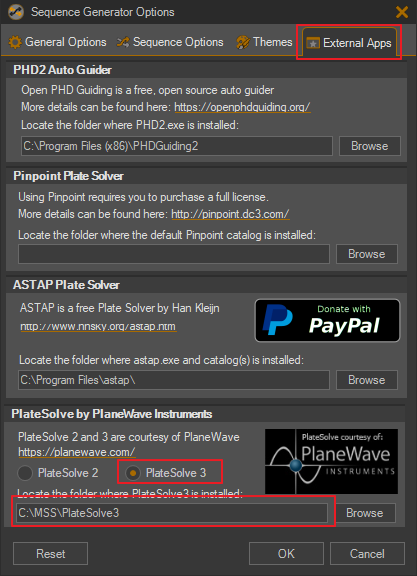
SGPro needs you to tell it where you have installed PlateSolve 2 and / or 3 via the menu, Tools > Options, then select the External Apps tab.
if you want to get a start on prepping for this change, here is the new help file for PlateSolve3 that will be in the next 4.3 beta release:
Install It
SGPro is compatible with both PlateSolve2 and PlateSolve3, but it no longer distributes either of them.This means that you are still able to use either, but you must install them separately and then tell SGPro where you have installed them.
Before you proceed, go ahead and go to PlaeWave’s website and doanload the latest version of PlateSolve3. At the time of this writing, PlateSolve3 has not been made as publicly available for user download and the best method to get PlateSolve3 is via Dropbox here.
After installing PlateSolve3 (which is done simply by extracting the files contained within the downloaded zip to any non-protected area of your disk), you’ll need to let SGPro know where you’ve placed it. Using the menu, navigate to Tools > Options. Then, click on the “External Apps” tab and move to the bottom of the form to the PlateSolve 2 and 3 area. Make sure that the option for PlateSolve3 is selected (and not PlateSolve2). Click on the “Browse” button and then, using the provided folder selector, choose the folder in which the PlateSolve3.X.exe and SRSLib.dll files are located.
Important!!!
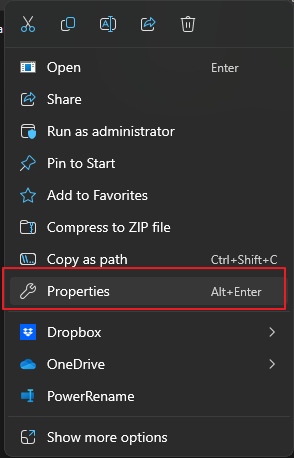
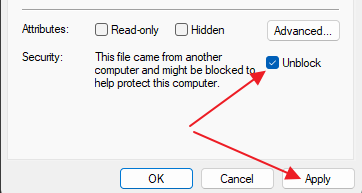
Depending on your security settings in Windows, you may be required to allow the newly downloaded SRSLib.dll and PlateSolve3.X.exe to run. By default, files downloaded from the internet and not installed with a trusted installer are marked as “blocked”. To unblock PlateSolve3, simply navigate to the PlateSolve3 folder in WIndows File Explorer, and then, for both files, right click and select “Properties”. Finally, near the bottom, tick the box that reads “Unblock” and click “Apply”.
Note: If you don’t have an “Unblock” option visible, it simply means the file is not blocked and you’re ready to go.
Right-click to get:
Then:
Configure It
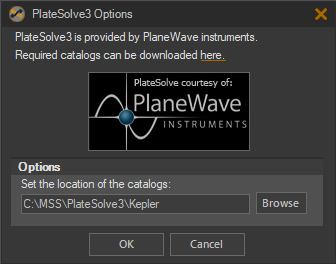
After install, PlateSolve3 Setup is fairly straightforward. To use it as your plate solver you will need one (or more) star catalogs. If you used the link above, then you already have both the “Kepler” and “UD” Catalogs available to you. If you installed PlateSolve3 a using a different method, you can get catalogs for it here on PlaneWave’s downloads page.
In the resultant dialog, simply choose the folder of the catalog that you’d like to use:
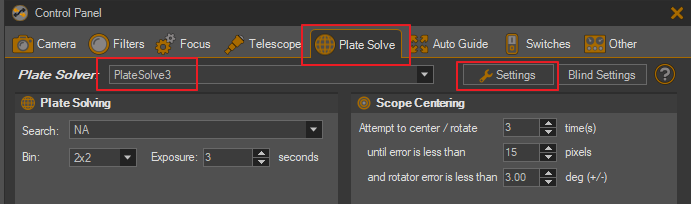
Setting the catalog for an equipment profile is very similar. Open the Equipment Profile Manager, select a profile to edit (or make a new one), click on the “Plate Solve” tab, select “PlateSolve3” and then click on the “Settings” button. In the resultant dialog, simply choose the folder of the catalog that you’d like to use: