Introducing AutoFlats
AutoFlats will be available starting in SGPro version 4.3 (in beta first). This work is complete, but still in a “pre-beta” testing phase at the moment. For convenience, the AutoFlats docs are posted here in the forum but, a better viewing experience can be found here:
Typically, we won’t write documentation for beta, but AutoFlats is a deep enough feature that part of the beta process will be determining the efficacy of its docs…
Without further ado…

AutoFlats is a complete replacement tool for gathering your flat frame calibration data. It can be used as a standalone tool, as part of a normal sequence or even to export normal “flat” events to the current sequence.
The goal, stated as simply as possible is this:
Create an environment where you can create a normal DSO target, give zero regard or thought to flat frames, click “Run” and, when the sequence is completed, you have perfectly viable flat frames to use and never had to worry about how or when they were captured (note you have to worry about that one time when you configure AutoFlats to work for you).
That’s it really. Below here, we just explore the details… read on if you’re interested.
Description
In a little bit more detail, AutoFlats allows you to define a generalized set of parameters about your flat frame capture (as part of an equipment profile). Then, using this input, AutoFlats will capture flat frames automatically for every imaging session. Doesn’t matter if you use a Flat Box, a wall mounted light panel or prefer Sky Flats. AutoFlats handles them all. Your Flat Frames will just appear next to your Light Frames when the sequence is complete. Of course, if you prefer, you can use AutoFlats as a standalone tool but, ideally, it’s run as part of the sequence.
AutoFlats is compatible with any light source, including full support for “sky flats”. With it, you can capture flats for your current sequence almost effortlessly. AutoFlats will automatically calculate the flat frames required based on your (minimal) input, match camera angle, gain and offset, arrive at focus and begin to take flat frames. It’s even smart enough to determine flat frame compatibility in order to prevent duplicate capture when a single set of flat frames will work for multiple different “light” events from your sequence.
To be sure, AutoFlats can be complex, but it doesn’t need to be. It has a lot of options available to it in order to accommodate for as many scenarios and workflows as possible. Odds are pretty high that your AutoFlats settings won’t be overly complex and that you’ll be able to “set and forget”. Future sequence creation won’t need to consider flat frames at all, yet, they’ll appear with the rest of your data when the sequence is complete.
Flat frame capture is a drag… AutoFlats is here to make it easy. You’ll no longer need to remember all of the sequencing parameters that are required in order to match them to their corresponding light frames. AutoFlats will certainly automatically manage and track your exposure length for you, but that is really just a very small part of what it can do. When you add “Flat Events”, AutoFlats will do its very best to derive all the information you’ll need to capture flat frames. It uses a new marker that SGPro leaves behind for all light events called “flat hints”. For all intents and purposes, Flat Hints are invisible to you, but AutoFlats knows how to find and use them. In the case that no Flat Hint marker exists, AutoFlats is also capable of finding and extracting required parameters from FITS headers.
Here we will cover both the automated use of AutoFlats as a child process to the main sequence and also manual use of AutoFlats as a standalone tool. We will cover standalone usage first since it will cover many of the aspects of its automation at the same time. If you are familiar with SGPro, you can think of it like Auto Focus. Auto Focus can be run as a standalone process or as part of a sequence by defining focus triggers. In the same manner, AutoFlats can run as a separate Flats tool or can define certain triggers that can automate Flat Frame capture as part of the sequence.
Required Vocabulary
In order to fully understand this documentation, it is imperative that we define certain terms within AutoFlats:
-
AutoFlats: Refers, collectively, to all features related to capturing or exporting flat data.
-
AutoFlats Manager (or AutoFlats tool or AutoFlats as a Standalone tool): Refers to the standalone tool (window) used to capture or export flat data.
-
AutoFlats Flat Frame: An individual image produced by the AutoFlats tool. These images will be combined in order to produce a “master flat”.
-
Flat Event: Refers to a set of Flat Frames. This is the level at which AutoFlats accepts user input (i.e. when you give AutoFlats direction to capture flat data, you define a Flat Event).
-
AutoFlats Deduplication: It is not uncommon that, for any given session, a single set of flat data may be compatible with multiple different sequence Light Events. Deduplication is the act of recognizing this compatibility and enforcing logic that will not allow capture of duplicate data.
-
AutoFlats Run: Essentially a “mini-sequence” that produces only flat data. When complete, an AutoFlats Run will produce Flat Frames (on disk) for all of its defined Flat Events.
-
AutoFlats Export: The act of converting the set of defined Flat Events into traditional SGPro “Flat-type” Events and saving them in new or existing Sequence Targets.
-
AutoFlats Scheduler: A tool that allows you to schedule an AutoFlats Run as part of the SGPro Sequence. AutoFlats can be scheduled to run automatically either before or after the sequence (or both).
-
“Before Sequence” Run: The AutoFlats Scheduler can direct the sequence to run AutoFlats prior to starting the first target.
-
“After Sequence” Run: The AutoFlats Scheduler can direct the sequence to run AutoFlats after the last target is complete.
-
Flat Setup Hint Source (or Reference): AutoFlats will attempt to do much of the work for you when importing new Flat Events. This term refers to the place in which AutoFlats sourced the data it used to assign fields like Camera Angle, Focus Position, etc.
-
Ranked Ordering: AutoFlats allows for Flat Events to maintain a complex, user-defined ordering that will influence the order in which Flat Events are captured. A Ranked Ordering means nothing more than “First, order by A, then within groups created by A, order by B”.
-
Sky Flats: The act of capturing flat data using the Sun as the light source.
-
Dusk Flats: Sky Flats taken as dusk.
-
Dawn Flats: Sky Flats taken as dawn.
-
Panel Flats: The act of capturing flat data using a light panel as the light source. This refers to Flat Boxes and simple light panels alike.
Running AutoFlats Outside of an SGPro Sequence
For a manual AutoFlats run, the idea is simple: Open AutoFlats, add the Flat Events you want to capture, click “go”. Since we know opening AutoFlats and clicking a button are simple, that means the usefulness of this tool is directly related to:
-
Its ability to easily add new Flat Events
-
Its ability to manage the nuances of coordinating gear state and tracking exposure length
We’ll cover both of these parts of AutoFlats…
Opening AutoFlats
AutoFlats can be opened via the toolbar or from the “Tools” menu by clicking on the “AutoFlats (capture flat frames)” menu item. If it’s your first time opening AutoFlats, it will appear with no Flat Frame events, but don’t worry… adding them is simple.

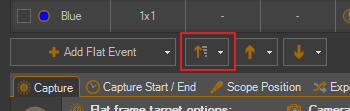
Clicking the “Add Flat Event” button will add a new “Blank” Flat Event to the AutoFlats Run. This is boring though (and barely useful). A better idea is to click the small dropdown arrow on the right side of the button, you will be presented with much more useful ways of adding Flat Events.

All of these options pertain to adding a new Flat Event in the context of specific light events. Most are self explanatory, but brief descriptions of each follow.
-
Add flat events for active light events: In the context of the current sequence, add a Flat Event for every “Light” event that is itself “active” (checked) and belongs to an “active” (checked) target.
-
Add flat events for active light events: In the context of the current sequence, add a Flat Event for every “Light” event that exists (both active and inactive) and belongs to an “active” (checked) target.
-
Add flat events for active light events: In the context of the current sequence, add a Flat Event for every “Light” event that exists.
-
Add flat events for active light events: In the context of a “light” frame FITS file, add a compatible Flat Event.
-
Add flat events for specific targets: At the bottom of the menu, a list of targets belonging to the current sequence will appear. Clicking one will add flat events for “light” events that will / would be captured during this sequence (i.e. active light frames)
What to do After Adding a New Flat Event
When adding new Flat Events with AutoFlats, most of the hard work will be done for you automatically at the time it is added to the AutoFlats run. Each Flat Event requires specification of a Filter (or that no filter is used), a Binning Mode and the number of flat frames to capture. Optionally, depending on your rig, you can specify Camera Gain, Camera Offset, Camera Rotation and Focus Position. Below is a brief description of each of the properties belonging to a Flat Event:

-
Active / Inactive: A Flat Event with a checked box is considered “active” and will be processed as part of the AutoFLats run. If the Flat Event is not checked, it will not be captured. It may be desirable to save a Flat Event of later by adding it now and unchecking it, then, at a later time, marking it as active.
-
Filter (required): A specific filter or specifying that no filter is used is required for all flat events. When the filter is changed, the number of flat frames to capture will automatically update itself to the number you have specified in that filter’s “Flat” properties. When set in the context of a Light Event, this property will be automatically populated in order to match the Light Event.
-
Binning (required): The binning mode to use for the Flat Event frames. If your camera does not support binning, this field will simply show as “1x1”. When set in the context of a Light Event, this property will be automatically populated in order to match the Light Event.
-
Gain and Offset (optional): If supported by your camera, you can specify the Gain and Offset values used for flat frame capture. When set in the context of a Light Event, these properties will be automatically populated in order to match the Light Event. Note that, if using a DSLR, the Gain field will be used to select ISO.
-
Angle (optional): This field refers to the mechanical position of the rotator (camera) and not the target or sky angle of the corresponding Light Event. If it is not defined, the rotator position will remain unchanged. If you use a mechanical rotator, it will automatically match the angle used when capturing the Light Event. Note: If you use the “Manual Rotator” (i.e. your hands), you can set this value to any number value you like (typically whatever helps you remember where to manually position your rotator… mark 1, mark 2, etc). During the AutoFlats run that uses manual rotation, it will pause and wait for you to move the manual rotator to the position specified in this Flat Event.
-
Focus Position (optional): This field refers to the position of the focuser when the Flat Event is captured. If it is not defined, the focuser position will remain unchanged. Note: You may have noticed that definition of an absolute Focuser Position may not actually equate to focus if the flat frame is taken at a different time (temperature) than the light frame. Fear not, AutoFlats will attempt to automatically modify the focus position used for the light frame using the temperature compensation properties defined in your sequence. If AutoFlats does not have the ability to do this, you will receive a warning prior to starting the AutoFlats Run and the Focus Position will be used unmodified.
-
Capture: This field specifies the number of flat frames to capture for a Flat Event. The Event is considered complete when this number of frames have been saved to disk. The default capture count for new Events can be set “per-filter” [add link to filter setup].
-
Progress: This field, also a progress bar, will show both the number and percentage of flat frames that are complete. Tip: This field is editable. Clicking on it will allow you to manually adjust the number of frames that have been captured.
-
Flat Setup Hints: In general, this field will show the source of any hints extracted in order to “match” the Flat Event with some corresponding Light Event. In other words, it answers the question: How did AutoFlats decide on the automatically generated values for the Flat Event? The type and color of the icon indicate that Flat Hints were or were not able to source matching Light Event properties from somewhere.
-
From a FITS file: A colored file icon indicates that the hints came from a FITS file. Hovering over the field with the mouse cursor will reveal the path of the actual FITS file that was used. A “grayed out” file icon indicates that some properties were extracted from the FITS file, but that the Flat Event may need your attention in order to actually match the properties of the corresponding Light Event.
-
From Sequence Flat Hints: A colored target icon indicates that the hints came from a Light Frame’s Flat Hint Marker. This is a new marker that SGPro leaves behind for all light events. For all intents and purposes, Flat Hints are invisible to you, but AutoFlats knows how to find and use them. A “grayed out” target icon indicates that some properties were extracted from the Light Event, but that the Flat Event may need your attention in order to actually match the properties of the corresponding Light Event.
-
No Flat Hints found: A “grayed out” question mark icon will indicate that the Flat Event was unable to source Flat Hints from anywhere.
The Flat Setup Hint field is automatically populated based on how the Flat Event was added. That said, clicking on the field will allow you to override the hint source manually by picking a specific Light Event from the sequence or by choosing a specific FITS file. In either case, choosing a new Flat Hint source will automatically update all properties in the Flat Event to “match”. This field has no explicit influence over how a Flat Event is captured and only serves to modify the preceding fields that actually do govern the capture process.
Note: All fields can be edited in place by clicking on them. Depending on the field, when clicked upon, the appropriate control required to edit will appear. Saving that value can be accomplished by using the “Return” key or by using the “Tab” key or mouse click to cause that control to lose focus. Pressing the “Esc” key will cancel the field’s edit and restore the field to its original value. There are cases in which certain Flat Event properties may not be available and clicking on those fields will result in no change (e.g. Camera doesn’t support Offset, etc)
Here is an example of some Flat Events that were populated using the “All Light Events” option:
The AutoFlats Run is Built, now what?
Now you’ve got an AutoFlats run ready to go. With it, you can
-
Run it to capture flat calibration data
-
Just save it for later (your custom AutoFlats run will save along with the rest of your sequence; currently only a single custom AutoFlats run is supported per sequence
-
Export it as Flat Events to the current sequence. This most closely resembles the previous “Flats Wizard” in SGPro. This method will result in the traditional “Flat” event type as part of the main sequence and these frames will be captured like any other sequence event.
Below, we’ll cover how to accomplish each of these actions…
Sequencing the AutoFlats Run (Manually)
Before you start the AutoFlats run, you may want to consider the order in which Flat Events appear in the list. An Flat Event run will run in the order it appears in the list. Does it matter? Maybe. The primary reading to order your Flat Events is for efficiency. Sky Flats are often a timed event and might be highly beneficial to enforce a particular order that maximizes the time available to you. For instance, you may have a very slow filter wheel and toggling back and forth between Flat Events that use different filters may cost you precious minutes. In this case you’d want to order Flat Events in such a way that the Filter Name is the primary ordering key. This will result in an AutoFlats run that minimizes the number of filter changes. After applying the filter grouping, the next “time suck” to consider is your hypothetically slow rotator. In this case, you’d want to apply an ordering option for rotator angle. At this point, you have instructed AutoFlats to group Flat Events by Filter and then, within those Filter Groups, further group by rotator angle. In this hypothetical case, AutoFlats has ordered Flat Events in such a way that it will prioritize minimizing Filter changes and then minimize Rotator movement within those Filter groups. With that in mind, here are some tools available to help you easily enforce whatever ordering scheme is best for your rig:
-
Moving Flat Events Manually: You can Right Click on a Flat Event and choose to move it up or down in the list (or to the top or bottom of the list).
-
Automatic Ordering: Alternatively, AutoFlats has a robust automatic ordering system in place. With it, you can choose to order the Flat Events by whatever properties you choose and in a ranked manner. In other words, you can specify “Sort by A and then by B and finally by C”. More on this below.
Moving Flat Events
Right click on a flat event and choose one of the “move” options:

Alternatively, you can use the “Move up” / “Move down” bottoms found below the Flat Event list.

Automatic Flat Event Ordering
Start by choosing the primary ordering property from the list in the upper right of AutoFlats and then clicking the “Add” button. Repeat this process to add more ranked ordering properties to the AutoFlats run. At any time, you can hover the mouse cursor over the “information icon” to the right and view the current ordering options. If you wish to clear the current ordering options (or restart), simply choose the “Manual (no sorting)” option at the top of the list.
Note: To add auto-ordering to the AutoFlats run, simply choose, in order of precedence, the properties that should be used for the ranked ordering. For each property chosen, be sure to click the “Add” button (the actual value displayed in the “Order by” dropdown control is of no consequence to the AutoFlats Run and, unless it is added to the ordering properties with the “Add” button, it will not be used).
Note: Moving a Flat Event manually (see above) will automatically clear any custom sorting you may have added previously.
Available ordering options:

Example tooltip showing current ordering options

Ordering Properties
Most options are self explanatory, but in the spirit of completeness, all are listed below:
-
Filter: Order events, by Filter Name (alphabetical order, ascending). The order is typically not important (but maybe). Usually, the importance of this option is related to “grouping” by filter in order to minimize the number of filter changes required during the AutoFlats run.
-
Narrowband toward light (for sky flats): Order Flat Events in such a way that narrowband filters will be processed during the period of time that has the greatest amount of light. In other words, if you are taking “Dusk Flats”, narrowband events will appear before broadband events and, conversely, if you are taking “Dawn Flats” narrowband events will appear after broadband events.
-
Binning (numerical, ascending): Order Flat Events in such a way that mode “1x1” appears first and “4x4” appears last.
-
Binning (numerical, descending): Order Flat Events in such a way that mode “4x4” appears first and “1x1” appears last.
-
Target Name (alphabetical, ascending): Order Flat Events alphabetically, by Target Name where Target Names that occur earlier in the alphabet will run before those that occur after it.
-
Target Name (alphabetical, descending): Order Flat Events alphabetically, by Target Name where Target Names that occur later in the alphabet will run before those that occur before it.
-
Rotator Angle (numerical, ascending): Order events by the specified Rotator Angle. Usually, the importance of this option is related to “grouping” by angle in order to minimize the amount of Rotator movement required during the AutoFlats run. It can also help to enforce the direction that the specified position is approached from.
-
Rotator Angle (numerical, descending): Order events using the same method described above, but order by angle from highest to lowest.
-
Most Complete: Order such that Flat Events that are closest to completion will run before those that are furthest from completion. This sorting option considers an event’s completeness as a percentage of its total frames that are finished.
-
Least Complete: Order such that Flat Events that are furthest from completion will run before those that are closest to completion. This sorting option considers an event’s completeness as a percentage of its total frames that are finished.
-
Active / Inactive: Order such that Active (checked) Flat Events appear in the list prior to those that are Inactive. This ordering has no bearing on actual capture order, it is just useful for visualization.
-
Focus Position (numerical, ascending): Order events by the specified Focus Position. Usually, the importance of this option is related to “grouping” by Focus Position in order to minimize the amount of Focuser movement required during the AutoFlats run. It can also help to enforce the direction that the specified position is approached from.
-
Focus Position (numerical, descending): Order events using the same method described above, but order by Focus Position from highest to lowest.
Adding a new ordering property will automatically cause the Flat Event list to re-order itself. That said, sometimes Flat Event property is changed in a way that will affect its order in the list, but because it is disorienting to modify a Flat Event property and then have that Flat Event suddenly move to a new location, the Flat Event will temporarily remain in its current position. You can request a re-ordering of events by clicking the button found below the Flat Event list.
The re-order manually button
Note: In the case where changing Flat Event properties that affect ordering never performs a re-ordering prior to capture starting, AutoFlats will perform a final re-ordering before beginning.
Note: The reason AutoFlats does not use standard “column clicking” to set order is because AutoFlats provides sorting options for properties that are not visible in the Flat Event list.
Define Properties for the AutoFlats Run
Now that Flat Events have been created and ordered, it’s time to describe properties that govern how Flat Events should be processed. For clarity, AutoFlats properties have been separated into three categories (each category / step occupies its own tab):
-
Step 1: Capture Properties
-
Step 2: Capture Start and End Times
-
Step 3: Scope Positioning
Capture Properties (Step 1; Tab 1)
Here, you can define general properties about the AutoFlats run:

-
Target Mean: This value, along with the “Tolerance” field below define the intensity (measured in ADU) of an acceptable Flat Frame. When a Flat Frame’s intensity is measured and found to be in the range spanning from Target Mean - Tolerance to Target Mean + Tolerance, it will be saved to disk. The frames will later be combined to create “Master Flat” data (not in SGPro). Typically, this value should be around half of the full-well pixel depth of your camera (e.g. your 16-bit camera has a well-depth of approximately 60,000 ADU and targeting a Flat Frame ADU value of 25,000 to 30,000 is likely desirable. Ultimately, the “ideal value” here is dependent upon your post capture workflow and the tools you use for processing).
-
Tolerance: The acceptable deviation from Target Mean (see Target Mean above).
-
Frames per event: A Flat Event is essentially just a description of a series of individual frames that will later be combined to create a “Master Flat”. This number governs the total number of frames that will be combined to create said “Master” data.
-
Minimum exposure length (seconds): By default, this value is 0 seconds. Increasing this value will result in a minimum exposure length for a Flat Frame. The most common use case for this value is for cameras that use a mechanical shutter. In that case, the minimum exposure length will be dependent upon the shutter’s actuation. If AutoFlats is unable to produce a Flat Frame that has an intensity within the acceptable range (see Target Mean above), the AutoFlats run will probably fail (there are limited circumstances in which AutoFlats can recover from this error if it is possible that a less intense light source will be made available simply by waiting (i.e. Dusk Flats).
-
Maximum exposure length (seconds): By default, this value is 0 seconds which is to be interpreted as “no maximum exposure length defined. It is typically OK to not define a value here as AutoFlats is proficient at determining most failure conditions. Increasing this value will result in a maximum exposure length for a Flat Frame. If AutoFlats is unable to produce a Flat Frame that has an intensity within the acceptable range (see Target Mean above), the AutoFlats run will probably fail (there are limited circumstances in which AutoFlats can recover from this error if it is possible that a more intense light source will be made available simply by waiting (i.e. Dawn Flats).
-
Sync AutoFlats progress with disk: Enabling this option will signal to AutoFlats that it should inspect the contents of the disk (where it would save individual Flat Frames) and override progress properties. In an ideal world, the number of Flat Frames that AutoFlats thinks have been completed would always be equal to the number of Flat Frames that have been saved to disk. But… because we do not live in that world and things happen that can cause these two values to fall out of sync, this option is available. If you only care about the end result of AutoFlats (individual Flat Frames saved to disk), you will want to leave this option enabled. If you forgot to save your sequence after AutoFlats ran or maybe SGPro crashes or freezes before it was able to save progress to the sequence, this option will allow for AutoFlats to continue where it left off. If enabled, resetting the progress of the AutoFlats will ultimately have no effect on the run’s progress and it will be reset as soon as the run starts. If you want to disregard previous frames for incomplete events, typically because you require that all valid Flat Frames were captured at a similar time and at an exacting angle, then you’ll want to disable this option. In a disabled state, AutoFlats will capture a number of Flat Frames equal to the number of incomplete frames as specified by the AutoFlats run. In this state, regardless of frames that were previously saved to disk, you can reset the AutoFlats run’s progress and all new Flat Frames will be captured.
Capture Start and End Properties (Step 2; Tab 2)
Here, you can (optionally) define any special instructions that modify the start or end time of an AutoFlats run.

Start Time Properties (Optional): In the case that no start time option is chosen, AutoFlats will start the run immediately upon clicking the “Run” button. In order to delay start, you may choose:
-
Start at dusk (for Sky Flats): When this option is selected, clicking on the “Run” button will validate the run, connect required equipment and then await the next occurrence of dusk. When this option is checked, the next occurrence of dusk will appear at the end of the option’s text so that you can more easily figure out when the run will start. AutoFlats calculates this value as the time associated with standard sunset (use the offset below to modify this value).
-
Start at dawn (for Sky Flats): When this option is selected, clicking on the “Run” button will validate the run, connect required equipment and then await the next occurrence of dawn. When this option is checked, the next occurrence of dawn will appear at the end of the option’s text so that you can more easily figure out when the run will start. AutoFlats will use the start of “astronomical twilight” for this option (use the offset below to modify this value).
-
Start at a specific time: Alternatively, you can specify the exact time you’d like to start the AutoFlats run.
-
Start offset: For any start time option, you may specify a start offset. The offset value is most useful for dusk / dawn options in that it creates the ability to specify a start time like “15 minutes after dusk”. This value can also be used when no start time delay option was chosen (see above). In this case, AutoFlats will interpret this value as “start (n) minutes from now”.
End Time Properties (Optional): In the case that no end time option is chosen, AutoFlats will end the run when all events are completed or it determines that it can no longer continue due to an issue like insufficient light. In order to override the default end time, you may choose:
-
End at dark (for Sky Flats): When this option is selected, the AutoFlats run will preemptively terminate when it is too dark to continue. AutoFlats is capable of determining, by itself, when not enough light exists, but specifying this option may allow for AutoFlats to finish without needing to go through the process of failing. When this option is checked, the next occurrence of ‘“too dark” will appear at the end of the option’s text so that you can more easily figure out when the run will end. AutoFlats calculates this value as the end of Astronomical Twilight (use the offset below to modify this value).
-
End at light (for Sky Flats): When this option is selected, the AutoFlats run will preemptively terminate when it is too light to continue. AutoFlats is capable of determining, by itself, when too much light exists, but specifying this option may allow for AutoFlats to finish without needing to go through the process of failing. When this option is checked, the next occurrence of ‘“too light” will appear at the end of the option’s text so that you can more easily figure out when the run will end. AutoFlats calculates this value using the time associated with standard sunrise (use the offset below to modify this value).
-
End at first target start: When this option is selected, AutoFlats will terminate the run using the start time of the first target in the sequence. If the first target does not use a start time, enabling this option will produce an error. When this option is checked, the next sequence’s first target start time will appear at the end of the option’s text so that you can more easily figure out when the run will end.
-
End offset: For any end time option, you may specify an end offset. The offset value is most useful for “too dark” / “too light” options in that it creates the ability to specify an end time like “15 minutes before too dark”.
Positioning the Telescope (Step 3; Tab 3)
Ultimately, before starting AutoFlats the telescope must be made to point at a light source. Here, you can (optionally) specify a predefined position that AutoFlats will automatically move to before starting. If you’d prefer to position the telescope yourself before starting, leave the “Manually position telescope” option selected. In order to automatically position the telescope when the run starts, you may choose:

-
Automatic (Sky Flats only): Selecting this option will position the telescope such that it is exactly 1 hour from zenith and 180 degrees opposite the Sun.
-
At a specific position: Typically used for Panel Flats, enter the position that corresponds to the mounting position of your light panel or that an automatic flat box can be used safely from this position.
-
At the Park position: Typically used for Panel Flats, it assumes that the Park position leaves the telescope pointing at a viable light source or that an automatic flat box can be used safely from this position.
-
At the Home position: Typically used for Panel Flats, it assumes that the Home position leaves the telescope pointing at a viable light source or that an automatic flat box can be used safely from this position.
Beginning Capture
At this point, you have a bunch of Flat Events and you have taken the time to detail how those events should be captured. You’re just a button click away from starting. Given that clicking the “Run” button doesn’t require much documentation, this section will cover what the AutoFlats Runner does and the order in which it does it.
Pre-Flat Event Actions
Upon clicking the “Run” button you may or may not be presented with some prompts that either inform you of odd or inconsistent settings, errors or calls to action (like manually position your telescope, etc). Once past the AutoFlats preamble, the AutoFlats run starts by connecting to any required equipment and then determining start and end times for the run (as defined above). Depending on your settings, the run will either start or delay until the desired start time. If a delay is incurred at this point, the AutoFlats run status area will indicate that it is waiting to start at a specific time.
At this point, AutoFlats will conditionally set the position of gear that will not change between Flat Events. This includes, in order of execution:
-
Position the telescope
-
Close the automatic flat box shutter
-
Start “unsafe condition” monitoring
Flat Event Actions
Now, AutoFlats will process Flat Events in the order they appear in the list. For more information on Flat Event ordering, see above. When AutoFlats starts a new Flat Event, the following actions are taken, in order:
-
Set the Flat Event’s specified filter
-
Move to the Flat Event’s specified rotator position
-
Determine the Flat Event’s ideal focus position and move the focuser
-
Set flat box brightness level
-
Set camera gain and offset levels
After equipment setup for a new Flat Event is complete, AutoFlats will continually expose the camera until the desired number of flat frames have been captured. A flat frame will be considered as captured if its measured intensity level falls between the Target Mean value +/- the specified Tolerance. If the flat frame falls outside of the allowable range, it is discarded. AutoFlats will continuously assess the required exposure length and adjust as necessary (even when the last flat frame is within the specified tolerance)
AutoFlats Notes
-
Locked Settings: While running, Flat Event order and most properties belonging to Flat Events are no longer editable until the run is terminated. Exceptions to this rule are that:
-
A Flat Event occurring later in the list than the currently running event, may be made Active / Inactive at any time.
-
The current Flat Event may be made Inactive and force movement onto the next Flat Event.
-
The number of Flat Event frames to capture can be increased or decreased at any time.
-
-
AutoFlats Recovery: AutoFlats is capable of recovering from a very limited set of issues that may be encountered during runtime. Specifically, AutoFlats can recognize, when capturing Sky Flats, if the act of simply “waiting” and letting a little time pass, may correct the issue. In other words, if you are capturing Dusk Flats and AutoFlats produces an error because it is unable to, at the minimum exposure length, produce a flat frame at or below the specified level, the run will simply pause and retry shortly (rather than fail and force you to so the same thing, but manually). The same is true for Dawn Flats (but opposite). Other errors seen during capture are currently not recoverable and will terminate the AutoFlats run.
-
Flat Frame File Naming: AutoFlats will use the same file naming pattern as the sequence to which it belongs. When using the “Target Name” as part of the file path, it should be noted that, due to the nature of Flat Frame data, the Target Name used in the file name may be a compound name. For instance, if you have sequence targets m42 and m33 and each captures Light data at the same angle with the same filters, then flat frame data will be captured for both targets at the same time. In this case, the Target Name used for the flat frame would be “m42-m33”.
-
Flat Frame Deduplication: Many times, when Flat Events are added to the AutoFlats run, they are duplicative in nature. In other words, the Flat Events cover Light Events for multiple targets, but those Light Events are similar in that the same set of Flat Frames can function as calibration data for both. AutoFlats will automatically deduplicate these frames and will only capture a single set of data. It is important to note that the Flat Event list, when inspected visually, will not appear to deduplicate. The deduplication of flat frames is considered at runtime only. As a visual indicator that this is happening, you may see Flat Events other than the currently running event increment progress at the same time.
Exporting Flat Events
The last section to cover (with respect to using AutoFlats as a standalone tool), deals with export of your Flat Events into the sequence. Prior to AutoFlats, the only way to capture flat frames was to introduce a Flat type event into the event table for a target. The introduction of AutoFlats provides more options to help you capture flats, but it doesn’t remove any. Specifically, it may be desirable, instead of using AutoFlats to actually capture the data, you use it to just define the flats you need and then export them to the main sequence. Whatever fits your particular workflow best…
To export Flat Events, click on the last tab, choose how to export and then click the “Export Button”.

Export Options
-
Add flat events to new targets: For each Flat Event defined, it will be exported into a new Sequence Target. The exporter will create as few new targets as possible and will group them by camera angle where a new Flats Target will be created to hold all Flat Events that are to be captured at a specific angle. The new Flat Target will be named using the names of all corresponding Light Targets (or “Multiple Targets” if too many). For example, a new target that holds Flat Events for a target named “m33” will be named “Flats (m33)”. A new target that holds Flat Events for a target named “m33” and “m42” will be named “Flats (m33,m42)”.
-
Add flat events to existing targets: For each Flat Event defined, it will be exported into existing Sequence Targets as “Flat” type events. If a Flat Event (above) does not define a sequence target as its “parent”, it will be added to a new target named “Flat Orphans”. In other words, this option will create Flat Events side-by-side with corresponding Light Events.
-
Pause sequence before starting flats: Checking this option will ensure that, prior to starting any of the exported Flat Events, the sequence is paused and you are alerted. This is useful if you need to perform any “pre-flat” setup steps like powering on a light panel or positioning the telescope.
Automating Flats as Part of the Sequence (Scheduling)
By itself AutoFlats is a powerful automation tool, but combined with the power of an SGPro sequence it can essentially allow you to never even have to consider Flat Frame capture again. Just create your normal DSO target with Light Events and SGPro will use AutoFlats as part of the sequence, dynamically produce the Flat Events work list and leave you with Flat Frame data you need to complete your image pre-processing. This next section will cover how to “schedule” AutoFlats as part of the sequence.
Currently, SGPro allows for scheduling AutoFlats as part of the sequence, but is run either before the first target or after the last (or both). Typically, these AutoFlats time frames will correspond to some type of Sky Flats, but they can also certainly be used to capture Panel Flats as well.
Assuming you feel reasonably comfortable with the concepts described above as part of the standalone use documentation, then it is safe to say that most concepts are the same and don’t need to be revisited. The main difference between using AutoFlats manually and using it as part of the sequence is that the manual method expects you to add your Flat Events and then take some action with them while the AutoFlats scheduler will build the Flat Events list dynamically based on the current set of Light data found in the sequence. The next sections will cover the specifics of directing SGPro to “schedule” flats capture in the way that best suits your needs.
Finally, it’s worth noting that for every AutoFlats option or setting discussed above, the Scheduler contains a corresponding setting. The settings found in the scheduler’s setup dialog will be used to run AutoFlats during execution of a sequence.
Running AutoFlats Before or After the Sequence
Access the AutoFlats Scheduler from the “Sequence” menu.

The Scheduler is separated into 4 steps in order to make things as conceptually simple as possible. Most settings found in the scheduler are single, solitary settings that apply to all scheduled AutoFlats runs, but sections 3 and 4 contain settings that will allow you to designate different parameters for those runs that are scheduled to run before or after the sequence. The next section will cover each of those four sections:
Step 1: Define Basic Capture Properties
These settings correspond to the settings found in the AutoFlats tool, Step 1 (see above).

-
Capture AutoFlats before sequence starts: Check this option if you want to schedule flat frame capture prior to starting the sequence’s first target.
-
Capture AutoFlats before sequence starts: Check this option if you want to schedule flat frame capture for after the sequence finishes. Note: post-sequence AutoFlats will only run if the sequence ends without error. This includes sequence endings due to event completion or due to a pre-established termination time. If you’d like to, in most cases, the AutoFlats can be forced to run after a sequence error. To do so, within Sequence Options, enable the “Capture calibration data even if sequence fails” option.
-
Sync AutoFlats progress with disk: While this option can be useful in many different cases, its primary use case is here in the Scheduler. AutoFlats run that execute as part of the SGPro Sequence are not saved. They are dynamic in nature and built at runtime. In the case where you want to capture flats both before and after the sequence or even across multiple different sessions (nights), checking this option will allow you to pick up from exactly where the last scheduled attempt ended.
-
All other properties: The remainder of the properties found in this section have a 1 to 1 correlation with an identical property found in the AutoFlats tool. For details on each, see above.
Step 2: Define how the Scheduler should make the Flat Event Work List

-
Matching type: Set this option in order to meet your image pre-processing workflow needs. Remember that a scheduled AutoFlats run will build the Flat Event work list dynamically just before it runs. This option defines how that work list is created.
-
Capture flats for all active Light Events: Selecting this option will create a work list containing a Flat Event for every active Light Event in the current sequence. A Light Event is considered active if it has its “Run” checkbox checked and belongs to an active target.
-
Capture flats for all Light Events in active targets: Selecting this option will create a work list containing a Flat Event for every Light Event belonging to an active target in the current sequence. A Light Event qualifies for this option if it belongs to an active target. Its “Run” status in the Event Table is not considered.
-
Capture flats for all Light Events: Selecting this option will create a work list containing a Flat Event for every Light Event in the current sequence. A Light Event qualifies for this option simply by existing. Neither the active status of its parent target or its “Run” status in the Event Table is considered.
-
-
Capture Custom AutoFlats Run: Use this option to override the dynamic nature of the Flat Event work list. Using this option, a scheduled AutoFlats run will use the work list you define here. To build the custom work list, click on the “Custom AutoFlats Run” link. When the AutoFlats tool appears, follow the instructions above for “Adding Flat Events”. Note that, for any SGPro Sequence, only one custom AutoFlats run can be saved. In other words, however you modify the AutoFlats worklist for the custom scheduling here, will also modify any work list you may have created by using the tool manually.The opposite is also true… modifying the work list manually will modify the “custom work list” that is captured as a part of the sequence. In this case, you will be presented with a warning stating so.
-
Automatic Flat Event Ordering: For details, see Flat Event ordering above. The only difference in the scheduler is that the chosen ordering properties are displayed in the (readonly) box below the dropdown. You can clear sorting properties by choosing the “Reset sorting (clear)” option at the bottom of the list. If no ordering properties are specified, the Flat Events will be run in the same order that their corresponding Light Event appears within the SGPro Sequence. To add auto-ordering to the scheduled AutoFlats run, choose and add ordering properties in the order that they should be applied (ranked ordering). For each property chosen, be sure to click the “Add” button. Note: The actual value displayed in the “Order by” dropdown control is of no consequence to the Scheduler and, unless it is added to the ordering properties with the “Add” button, it will not be used.
Note: For options above that will dynamically match Light Events with Flat Events, the resultant (visual) list will make no effort to deduplicate compatible Flat Events (i.e. when a single Flat Event is compatible with multiple Light Events), but AutoFlats is smart enough to know not to capture this data more than once. The deduplication currently takes place during the run and not as part of the displayed list in order to more effectively convey that all of you Light Events have been considered.
Step 3: Define Start and End Parameters

These settings correspond to the settings found in the AutoFlats tool, Step 2 (see above). Note that this section contains two tabs where the first belongs to all AutoFlats runs scheduled to run before a sequence and the second belongs to all AutoFlats runs scheduled to run after a sequence.
-
Define start and end time instructions to the scheduled run: Start and end time options for “before” and “after” runs are slightly different in that “before” runs allow you to choose timing options related to dusk and “after” runs allow you to choose timing options related to dawn.
-
All other properties: For all options in this section, a corresponding option will exist in the AutoFlats tool and more detail can be obtained in the documentation covering how to run the AutoFlats tool manually (above).
Step 4: Define the Telescope’s Position
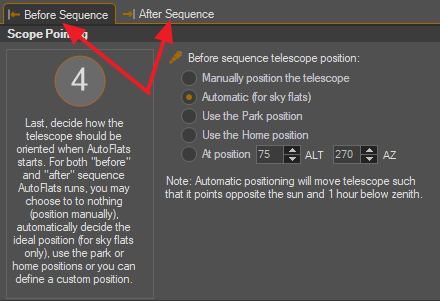
These settings correspond to the settings found in the AutoFlats tool, Step 3 (see above). Note that this section contains two tabs where the first belongs to all AutoFlats runs scheduled to run before a sequence and the second belongs to all AutoFlats runs scheduled to run after a sequence.
-
Define the Telescope’s position: If desired, you can direct AutoFlats to automatically point the telescope at your light source. Telescope positions have identical types of options for both “before” and “after” run types, but, when organized in this manner, it allows you to define different telescope positions for each type of run. This allows for your own custom “before” or “after” sequence positions based on positioning of the sun with respect to custom obstacles. In most cases, of you don’t have custom requirements, it is desirable to use the “Automatic (for SkyFlats)” for both “before” and “after” run types.
-
All other properties: For all options in this section, a corresponding option will exist in the AutoFlats tool and more detail can be obtained in the documentation covering how to run the AutoFlats tool manually (above).
Preview the Scheduled AutoFlats Run
Ideally, after completing the AutoFlats Scheduler setup, you’ll want to preview how the SGPro Sequence will run AutoFlats. In order to do this, locate the preview tools in the lower right hand corner, choose either “before” or “after” from the dropdown menu (based on if you want to preview the “before” or “after” run type that will be scheduled). Then, click anywhere on the link text. The AutoFlats tool will open in preview mode and allow you to see all settings and generated Flat Event work lists.
Add Scheduled AutoFlats Parameters to the Equipment Profile
Other
Use the Control Panel to Manually Move to Before / After Positions
If desired, you can manually modify the position of the mount from within the SGPro Control Panel’s Telescope tab. Located in the upper right section, enter the required Alt / Az position for your light source. This can be a good way to zero in on any custom telescope positions that you’d like to use in the AutoFlats Scheduler. In general though, it is preferable to have AutoFlats complete telescope positioning automatically.
Unsafe Status Support
Whether AutoFlats is run inside or outside of an SGPro sequence, it will honor the “safe / unsafe” status as indicated by your Safety Monitoring device and will perform identical shutdowns.
Relationship with the Flats Calibration Wizard
AutoFlats is not a replacement tool for the Flats Calibration Wizard and the wizard’s functionality has not changed. To clarify:
-
The Flats Calibration Wizard is a tool that allows you to capture sequence parameters like exposure time, panel brightness, etc that are used later during the capture of flat data.
-
AutoFlats is the set of all features in SGPro dedicated to the capture of flat data for use in your image pre-processing workflow. During execution of a run, AutoFlats may source starting exposure time and panel brightness using values calculated from the Flats Calibration Wizard.